

You are here: Nature Science Photography – Visual acuity – Image sharpness II
That was an extremely large amount of theory up to this point. Hard to digest sometimes, I admit. For this reason, I want to summarize the most important facts about depth of field, resolving power and diffraction. A kind of checklist that will guide you from 35 mm format to a crisp 20×30 cm print. Or, of course, after changing the corresponding values, from any other original size to any other final format.
1. determination of the enlargement scale
A 20×30 cm print has an aspect ratio of 2:3. This is fortunate because it corresponds exactly to the aspect ratio of the 35 mm original. Any other ratios would need to be considered separately in this context. The 20×25 cm format, for example, has an aspect ratio of 4:5. If we enlarge a 35 mm slide onto it, we will only utilize a 24×30 mm section. This section has a format diagonal of 38.42 mm. The original has a diagonal of 43.27 mm. The diagonal of the 20×25 cm format measures 325.3 mm, and 325.3/38.24 results in a magnification factor of x8.47. Our 20×30 cm print has a format diagonal of 36 cm and 360/43.27 results in a magnification factor of x8.3. You determine the format diagonal Fd according to the formula:
Formula 32
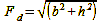
b = Image width
h = Image height
2. determination of the maximum permissible circle of confusion diameter
Here we start with a value of 0.2 mm, which is sufficient for a good impression of sharpness, and 0.2/8.3 = 0.024. Conveniently, we can calculate the required resolution in line pairs per millimeter for the negative by taking the reciprocal (1/x) of this value: 1/0.024 = 41.6 Lp/mm. These values ensure that the print appears sharp from a distance of 20 cm. This is the minimum distance from which an adult can see sharply. If you assume that your print will be viewed from a greater distance because of its larger format (it is often assumed that the distance corresponds to the format diagonal), the requirement for sharpness may be lower. Then, 0.2/200 mm equals 0.001; multiplying this by the viewing distance (e.g., 300 mm), we get 0.3 mm for the circle of confusion.
3. Determining the optimal aperture
Determine the front and rear limits of the depth of field (Sv and Sh) for the actual scene you want to capture, based on your image idea. You need these values to determine the optimal aperture that will render the desired area in focus with the desired circle of confusion diameter z:
Formula 33
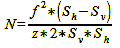
The difference in results between the calculation using z = 0.024 mm and z = 0.03 mm is often less than a whole f-stop. Therefore, you can only take full advantage of this completely manual method if the lens allows you to enter aperture values in 1/2 or 1/3 steps. For example, for Sv= 3000 mm and Sh= 7000 mm, z = 0.024 mm gives an aperture N of 9.92, and z = 0.03 mm provides N = 7.94. Of course, you should consider whether the calculated optimal aperture allows a shutter speed that eliminates object or camera shake. If not, you must increase the sensitivity of the recording medium or underexpose the film and push it by the required number of stops during development.
4. Determination of the optimal focus point
In addition, you put Sv and Sh into another formula to determine that focus point Fp which ensures that both ends of the depth of field come out equally sharp/blurred:
Formula 34
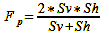
In most cases, determining the exact distance using the lens’s focusing ring can be challenging due to the relatively thin numbers. For this reason, it is recommended to put a centimeter measure, a folding rule or an ultrasonic rangefinder in the photo backpack. Such a utensil is also useful in locating a target at the optimal focus point, either inside or outside the image frame. You can then focus on this and, if necessary, pan back to the actual subject area. You can use specially designed distance scales as an additional tool, simply pasting them over the ones provided by the lens. You can index them by positioning a subject at regular, precisely defined distances, and then focus the optics on it. You then mark the focus point with a fine marker on the self-adhesive strip.
Remember that the figures given here as an example only apply to the underlying case: The given example is a 20×30 cm print from a 35 mm format, featuring a circle of confusion with a diameter (z) of 0.2 mm and a resolution of 5 Lp/mm. If you change one of these basic values, then z, the optimal aperture and the diffraction limitation must be recalculated.
5. Determination of the diffraction limit
Finally, you need to make sure that the calculated optimal aperture does not produce diffraction slices larger than the maximum allowable diameter of the circle of confusion. Calculate the diffraction-limited aperture number as follows:
Formula 35

In the case of our calculated maximum permissible circle of confusion diameter, 0.024/0.00135386 equals 17.7. Therefore, if we do not stop down further than f/16, we can ensure that the diffraction discs do not exceed the maximum permissible diameter of the circle of confusion, thereby preserving the impression of sharpness. If you want to photograph a wide landscape and are interested in the maximum extension of the depth of field, work with that aperture just below the diffraction limit and use its associated hyperfocal setting. So in 35 mm, you set f/16 and turn the focusing ring until the infinity symbol is opposite the corresponding aperture mark on the depth of field scale. In other words, you focus at the hyperfocal distance of 1.22 m. At 24 mm focal length, this gives you a sharp area extending from 61 cm to infinity (f 28 mm = hyperfocal distance 1.66 m, depth of field from 83 cm to infinity, f 35 mm = hyperfocal distance 2.59 m, depth of field from 1.29 m to infinity). If the calculated optimum aperture is smaller than the diffraction limit, you must either increase the distance to the near limit Sv for the same focal length or shorten the focal length for the same distance. In any case, you should then repeat the calculation.
This checklist has made the shooting procedure more intricate than it was previously. However, following it will improve your shots‘ sharpness, making the effort worthwhile twice over. This works regardless of format or equipment price.
Fortunately, these calculations don’t need to be done by hand before every shot. You only need to calculate the circle of confusion diameter and the diffraction-limited aperture once for each capture format and print size. When determining the optimal aperture for a finite depth of field range, you can use a programmable calculator that remembers the formula or a free webservice like https://www.dofmaster.com that allow you to freely select the circle of confusion diameter.
Next Practical evaluation of the recording systems
Main Visual acuity
Previous Resolving power, viewing distance and print size
If you found this post useful and want to support the continuation of my writing without intrusive advertising, please consider supporting. Your assistance goes towards helping make the content on this website even better. If you’d like to make a one-time ‘tip’ and buy me a coffee, I have a Ko-Fi page. Your support means a lot. Thank you!
 Since I started my first website in the year 2000, I’ve written and published ten books in the German language about photographing the amazing natural wonders of the American West, the details of our visual perception and its photography-related counterparts, and tried to shed some light on the immaterial concepts of quantum and chaos. Now all this material becomes freely accessible on this dedicated English website. I hope many of you find answers and inspiration there. My books are on