

You are here: Nature Science Photography – Image creation, Depth and Size – Photographic size mapping
Let’s assume you have calculated the distance, say 25 cm, from which you can image your subject at the desired scale. You put the camera on the tripod, move everything into position, and notice when focusing that the closest focusing distance of the lens does not reach far enough down. It stops at 0.5 m, and there you are still a long way from the predetermined image size. Again, we need some theory to understand why this has to be the case with „normal“ lenses.
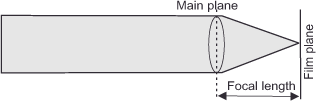
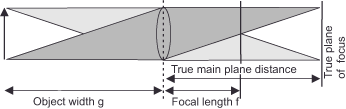
We start with the focal length. The focal length signifies the distance between the lens’s main plane and the plane that sharply images objects at infinity. So for a lens with a focal length of 50 mm, the distance between the main plane of the lens and the film plane is 50 mm. Due to the infinite distance, the light rays emanating from the object in this case strike the lens in parallel (figure 72, Focal length). If the object distance falls below the dimension „infinite“, two things happen: 1. the image of the object increases and 2. the distance between the main plane and the focal plane also increases, because the light rays lose their parallelism and have to cover a longer distance to meet again at one point (figure 72, Divergence). To the same extent, we have to move the lens away from the film to achieve a sharp image. At this point, we come back to the problem we posed at the beginning of this article, namely why it is no longer fun to adjust the lens. If the distance falls below the focal length of the lens, its refractive power is no longer sufficient to focus the non-parallel light rays at one point, and the image is no longer sharp. In this case, we have to intervene with a trick and increase the distance between the lens and the camera to extend the mechanical adjustment range of the lens in favor of shorter shooting distances.
Macro lenses, designed for short shooting distances, are the first choice for focusing on extremely close subjects. Typically, macro lenses have focal lengths of 50 or 100 mm, and their setting range aims to achieve a maximum reproduction scale of 1:2 or 1:1. Due to their elaborate optical correction and superior imaging quality, they are almost always considerably more expensive than regular 50s or 100s but allow super-convenient close-up photography by preserving all the camera’s automatic and convenience features, such as automatic aperture and autofocus. – In the following sections, you will see that this is not possible with various other accessories.
Extension rings are another way to get into the close-up range. They are usually available as a set of three with different thicknesses and you use them individually or together. Their handling is simple: first, the thinnest ring is mounted between the camera and the lens. If the adjustment range is sufficient, meaning you can set a sharp image at the desired scale, then proceed to take your shot. If it is not sufficient, attach the next thicker ring or a combination of several rings. Optimally suited for use with extension rings are lenses with a fixed focal length of at least 50 mm. On the other hand, avoid combining zooms and wide-angle lenses with them, as their design often leads to image errors known as „hot spots“. In this scenario, the center of the image appears brighter than the edge, making it challenging to discern in the camera viewfinder. If you utilize a set of extension rings tailored to your camera system, without the need for an adapter, you can access all the convenient features like automatic exposure and autofocus, and operate as though your lens had a correspondingly shorter closest focusing distance. For large image scales, you can also use a reversing ring to reverse the lens to improve image quality. Background: Normal shooting lenses are designed so that the distance between their front lens and the subject is large, while that between the rear lens and the film is small. In macro photography, on the other hand, the distance to the subject is smaller than that to the film. By actually placing the lens in the wrong position, you now re-establish the conditions that suit the lens best, namely that the greater distance is on the side of the front lens. Of course, this means that you lose the automatic aperture closing because the connections and transmission mechanisms are in the air on the side facing away from the camera.
Bellows devices go one step further in the direction of larger imaging scales. They consist of two movable standards connected by a light-tight bellows. The rear standard holds the camera body, the front standard holds the lens, and a tripod supports the entire construction. The magnification can thus be adjusted continuously and become very large, because the potential distance between the standards is large. If this is still not enough for your image idea, you can additionally mount extension rings between the camera and the bellows. – However, this already brings us from macro to microphotography. To achieve the highest possible image quality, you should refrain from using the camera lenses in conjunction with the bellows. These are calculated for normal image situations with objects at different distances and therefore have a curved image field, which becomes blurred towards the edge when focusing on the center and vice versa. However, since the objects in close-ups are often in one plane, special macro heads or enlarging lenses (4-lens lenses with symmetrical construction deliver good results; apochromatically corrected 6-lens lenses are the wickedly expensive crowning glory) are better suited. They are calculated for short shooting distances, have extremely low distortion and have a flat image field, so that the image is razor-sharp right to the edge, even with an open aperture. Because the distance adjustment is made on the bellows, neither lens type typically has a mechanical option. Unless you dig quite deep into your pocket, you will also have to do without the automatic aperture and be satisfied with the working aperture. So you focus with the aperture open, close the aperture manually to the predetermined value (usually all the way down to achieve the greatest depth of field), and then release the shutter. However, since it takes a while to choose the right frame and focus with the bellows anyway, this loss of convenience is not a big deal, according to many avid macro photographers.
If you only occasionally want to venture into the realm of close-up photography and therefore shy away from purchasing the aforementioned expensive accessories, close-up lenses are the right choice for you. They increase the refractive power of the optics, ensuring that the lens’s setting range is adequate even for very short shooting distances. Close-up lenses are available in strengths between 0.5 and 10 diopters. We calculate their focal length using the inverse: 0.5 diopters correspond to 1/0.5=2 m. The disadvantage of close-up lenses is the significant deterioration in imaging quality due to the large image errors of the individual lens. – For good reason, high-quality lenses consist of several lenses that compensate for each other’s aberrations. Just as with extension rings, zoom lenses and focal lengths below 50 mm should not be combined with close-up lenses, because this also results in the „hot spots“ already mentioned. Fixed focal lengths between 50 and 135 mm are ideal.
Main Image creation, Depth and Size
Previous Factors of size representation – The shooting distance
If you found this post useful and want to support the continuation of my writing without intrusive advertising, please consider supporting. Your assistance goes towards helping make the content on this website even better. If you’d like to make a one-time ‘tip’ and buy me a coffee, I have a Ko-Fi page. Your support means a lot. Thank you!
 Since I started my first website in the year 2000, I’ve written and published ten books in the German language about photographing the amazing natural wonders of the American West, the details of our visual perception and its photography-related counterparts, and tried to shed some light on the immaterial concepts of quantum and chaos. Now all this material becomes freely accessible on this dedicated English website. I hope many of you find answers and inspiration there. My books are on