You are here: Nature Science Photography – Visual acuity – Image sharpness III
„Unsharp masking“ to achieve a visually sharper image impression – the headline is a contradiction in terms, isn’t it? But it works, and the term dates back to the old days of the analog darkroom. Unsharp masking means that a negative is copied with an unsharp mask of itself to increase edge sharpness.
We create the mask by copying the negative onto another film, which then becomes a positive. Since special masking films are either no longer available, difficult to obtain, or very expensive, the most practical film to use is Ilford Ortho Plus or Kodak Tmax, for example. Place the original and copy film on top of each other, emulsion side up, with the original negative at the top. To keep them in the correct position, a copy frame is useful. The light passes through the original emulsion and its carrier layer before reaching the copy film emulsion. Therein lies the trick, as the carrier layer scatters the light, providing the slight blur of the mask. Typical layer thicknesses are around 0.18 mm. The higher this value, the more blurred the mask becomes. You can vary the effect by placing clear plastic strips of varying thickness between the original and the copy. Following the copying process, we normally develop the masking film. The second step involves placing the blurred mask in the enlarger alongside the original image and copying it onto photographic paper. To ensure a precise alignment of both images, it is beneficial to register them using a punch and pin.
Correct planning is necessary for the mask to turn out well. To do this, first measure the highlights and shadows of the original and calculate their density difference. Next, determine the necessary increase in the mask’s contrast. This depends on the subject, your own image idea and taste, but an increase of two gradation steps is a good starting point. The exposure and development values that produce the desired effect depend, of course, on the film stock, the lab equipment, and the process conditions. Therefore, providing concrete numbers is not very useful in this context. The web, special technical literature, or, best of all, a workshop are better suited for this. And ultimately, nothing works without intensive testing anyway.
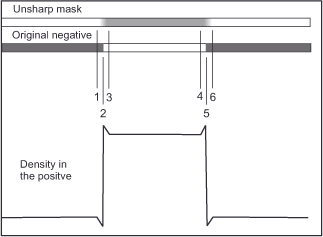
It is much more important to understand why the approach works in the first place. To understand this, figure 56 (Unsharp mask analog) helps us. . It shows the negative and the unsharp mask lying on top of each other as a sandwich. Below, the vertical displays the density of the positive, while the horizontal displays its image position. From left to right, we see a high density in the negative up to point 1, which leads to a relatively low density in the positive. Between point 1 and point 2, the blurred edge of the mask has an effect. It either increases the negative density or decreases the positive density. This accounts for the downward-pointing jaggedness in the curve. At point 2, the curve reverses as the negative shifts from the highlight area, which has a high density, to the shadow area, which has a low density. So the print density increases sharply. The unsharp mask, however, reaches its maximum density only at point 3, and therefore the print density drops again slightly up to this point. We see the opposite behavior between point 4 and point 6. The unsharp mask thus lowers the positive density on the light side of the edge and increases it on the dark side. As a result, it creates a faint halo of light that contrasts with the brightness and color of the surrounding area. If the whole thing is not exaggerated in color images, we do not see the false color in the finished image, but we do see the difference in brightness because our visual system is more sensitive to brightness than to color.

It remains to be noted that the difference between the original copied without and with mask is most obvious in the direct comparison of the two positives. This method not only sharpens the image, but also decreases the contrast range of the original negative. This is often used to copy high-contrast slides.
Next Greater edge sharpness through digital unsharp masking
Main Visual acuity
Previous Greater edge sharpness through “sharp development”
If you found this post useful and want to support the continuation of my writing without intrusive advertising, please consider supporting. Your assistance goes towards helping make the content on this website even better. If you’d like to make a one-time ‘tip’ and buy me a coffee, I have a Ko-Fi page. Your support means a lot. Thank you!


 Since I started my first website in the year 2000, I’ve written and published ten books in the German language about photographing the amazing natural wonders of the American West, the details of our visual perception and its photography-related counterparts, and tried to shed some light on the immaterial concepts of quantum and chaos. Now all this material becomes freely accessible on this dedicated English website. I hope many of you find answers and inspiration there. My books are on