

You are here: Nature Science Photography – Image creation, Depth and Size – Photographic size mapping
In photography, we have grown accustomed to viewing the image output as a reduced and not identically sized version of reality. If we consider dimensions before taking a photograph, it is either to accurately document them with macro equipment or to grab the viewer’s attention. Regardless of our intentions, photography technically allows us to display object sizes exactly as we experienced them or change them as we see fit. In contrast to human impression of size, which is influenced by a variety of external and internal elements, the size of an item in photography is determined solely by the focal length of the lens used and the shooting distance, or, more specifically, image distance.
Figure 67 Scale of reproduction 1 illustrates the conditions during image formation. The object is located on the horizontal optical axis. For simplification, the vertical principal plane in the center unites the normally existing image-side and object-side principal planes. The main planes serve as imaginary planes where rays parallel to the optical axis undergo refractive action, passing through the focal point (3) on the object side or (4) on the image side. The distance between the image-side main plane and the image-side focal point then defines the focal length of the lens. With this, we have already named one of the two occurring rays, those that run parallel to the optical axis (A+C). They are refracted and pass through the image-side focal point (4). All other rays (B) are not refracted and pass through the optical center point (M), the intersection of the optical axis with the main plane. The image width (b) is the distance of the image from the image-side main plane (here main plane), the object width (g) is the distance of the object from the object-side main plane (here main plane). The object width (g) differs from the lens’s set distance, as it represents the subject’s distance from the film plane.

The scale formula mathematically prepares these relationships and gives us information about the reproduction scale, which determines the proportions (formula 2):

M = image scale
B = image size
G = object size
b = image width
g = object width
f = focal length
The object distance can be calculated from the distance setting as follows (formula 3):

g = object distance
E = distance setting
d = main plane distance
f = focal length
The object distance describes the distance between the object to be imaged in an optical system and the imaging system of optical lenses or/and mirrors and the image-side main plane along the optical axis.
The scale formula produces a decimal number, which, when written as a fraction (numerator = image, denominator = object), tells us how much the image is larger or smaller than the object. Thus, a scale of 1:1 expresses that the object and the image are the same size. A scale of 1:2 tells us that one unit of size (mm, cm, m, …) in the image corresponds to two units of size in the original and that the image is half the size of the original. Conversely, a scale of 2:1 tells us that two units of size in the image correspond to one unit of size in the object, and that the image is therefore twice as large as the object.
The image scale is the ratio of an object’s picture size to its real size, and it is calculated by the shooting distance and the lens focal length using the following relationship: The smaller the distance and/or the longer the focal length, the larger the final image. However, the lens focal length can only be adjusted within specified limits, as wide-angle lenses cause plainly obvious distortions if the shooting distance is too short, as per perspective foreshortening.
Without wanting to annoy you, I can offer you another solution path that does not require the object distance. In order to follow it, the auxiliary value p must be calculated first (formula 4):

It is then inserted into the formula 5:

M = image scale
p = auxiliary value
e = Acquisition distance
f = focal length
As a result, you get two values, a plus and a minus variant. Both scales are reciprocal, so they are correct. Explanation: For the scale 1:2, the distance is the same as for the scale 2:1. Only once the object distance is large and the image distance is small, and another time it behaves the other way around. But the sum is the same in both cases.
With the following approximation formula, it is even a little easier (formula 6):
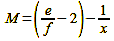
M = image scale
e = Exposure distance
f = focal length
This implies that the bracket subtracts its own reciprocal value from the result. As long as the value is at least 3, the total error of the calculation remains negligibly small, because, as we will see below, the initial values are usually not precise enough to allow a 100% exact calculation.
Would you like to put abstract mathematics into practice? Let’s say you take a picture of an object, e.g., a penguin figure of 8.5 cm height with a 100 mm lens from a distance of 1200 mm. In this case, the magnification calculation appears as follows (formula 7):
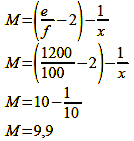
The penguin is thus depicted at a scale of 1:9.9 or with a height of 8.5 cm x 1:9.9 = 0.86 cm. The geometry of this case is shown in figure 67 Scale of reproduction 1.

A second case: the same figure, shooting distance 1200 mm, focal length 200 mm (formula 8):
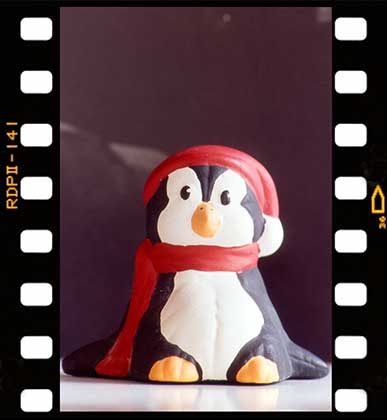
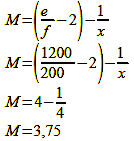
The black and white comrade is thus imaged with a focal length of 200 mm at a scale of 1:3.75 or with a height of 8.5 cm x 1:3.75 = 2.26 cm. Why the image is enlarged with an extended focal length is shown in figure 70 (Scale of reproduction 2).
Focal length extended, Image scale 1:1
200 mm focal length and 1200 mm distance. See Fig. 69 and calculation.
In the second case, we have doubled the focal length and found that the magnification increases. If we change the second variable with the distance while keeping the focal length the same, we find that halving the shooting distance has the same effect as doubling the focal length (formula 9):

With a focal length of 100 mm and a distance of only 600 mm, the calculation results in an image scale of 1:3.75, which is exactly the same as with a focal length of 200 mm and a distance of 1200 mm before. Fig. … Magnification 3 also graphically explains why the image is enlarged in this case. The larger the focal length and/or the smaller the object distance, the larger the magnification. This is true regardless of the image format. Since I assume that I have convinced you with the calculated and graphically derived proof, I do without the proof photo here.
Macro images show a magnified image of a subject. Close-up and long-distance images show a subject in a reduced size. Common image scales for close-ups are 0.1:1 to 1:1. Scales smaller than 0.1:1 are classified as long-distance images.
To image an object at a predetermined scale, we can also calculate the correct shooting distance for each focal length. The formula for this is (formula 10):

g = object distance
M = image scale
f = focal length
Practically implemented, this means for the scale 1:1 and 100 mm focal length (formula 11)

A word about the accuracy of the formulas presented, both of which actually only give approximate values for various reasons. Both formulas require the main plane distance to function correctly. You need to include it in the distance calculation and subtract it from the scale calculation. Watch out: It can be positive or negative, so pay attention to the sign! As a rule, the main plane distance is only a few millimeters or a few centimeters at the most, but unfortunately there are no suitable „over the thumb“ values. If you cannot find it in the technical documentation of your lens, it is better to leave it out completely. This will not have a lasting effect on the calculation result. This is because even the nominal focal length value of the lens, which is usually used as a basis, is not a constant depending on its construction but can change with focusing. This is because there are two ways to get a subject in focus at a given distance.
1. To capture close subjects, you can shift the lens package of the optics from its infinity setting along the optical axis, away from the camera. When focusing on close subjects, this leads to a greater overall length and an associated shift in the center of gravity. The latter is meaningless for short focal lengths but leads to noticeable disadvantages with telephoto lenses.
2. The optics‘ lens package always remains in the infinity setting, thereby reducing its focal length for closer subjects. This method is called internal focusing and it is realized by moving selected lenses, which need to move only a little and therefore influence the lens center of gravity only insignificantly. Since the front lens is not part of this moving package, the lens build length remains unchanged.
To what extent your optics are affected by this focal length reduction and the manufacturing tolerances, which are in the range of several percent, you can test yourself with some comparison shots. Simply capture an object of a known size using the lens under test at various distances and identify which image accurately represents it at a 1:1 scale. According to the calculation done at the beginning of the section, the object distance for the 1:1 scale and 100 mm focal length is an even 400 mm. If your 100 mm lens delivers the desired scale of 1:1 in the test shots not at 400 mm distance but at only 300 mm, it can be concluded that the focal length has decreased to 300/4=75 mm. With the effective focal length determined in this way, you can then calculate the distance required for any desired scale. For the scale 1:3 and 100 mm focal length, for example, this results in a distance of (formula 12):

Next Factors of size representation – The shooting distance
Main Image creation, Depth and Size
Previous Building blocks of our size perception – The settlement of distance
If you found this post useful and want to support the continuation of my writing without intrusive advertising, please consider supporting. Your assistance goes towards helping make the content on this website even better. If you’d like to make a one-time ‘tip’ and buy me a coffee, I have a Ko-Fi page. Your support means a lot. Thank you!
 Since I started my first website in the year 2000, I’ve written and published ten books in the German language about photographing the amazing natural wonders of the American West, the details of our visual perception and its photography-related counterparts, and tried to shed some light on the immaterial concepts of quantum and chaos. Now all this material becomes freely accessible on this dedicated English website. I hope many of you find answers and inspiration there. My books are on