

You are here: Nature Science Photography – Visual acuity – Image sharpness I
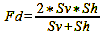
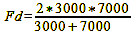
Up to this point, we have dealt with calculating how the depth of field is distributed around a point at distance G (subject distance) for a given focal length, aperture and distance. This process was highly theoretical yet crucial for comprehending the subject matter. In practice, however, we regularly proceed differently. Usually, we are faced with dealing with collections of motifs or parts of motifs at different distances. We determine which of the motifs should appear „sharp“ in the picture based on our (hopefully) creative idea. We have already answered the question of the focal length, and we have also calculated the aperture that will bring the desired area into focus using formula 14. Now the question remains on which point Fd we should focus, so that the two ends of the depth of field at e.g., 7 m and 3 m turn out equally sharp and blurred, respectively. A rule often quoted in this context says that you should focus at a distance that is 1/3 of the total depth of field behind the close-up point Sv. Setting the near point at 3 m and the far point at 7 m results in a focus point of 4.2 m. Because 7 m – 3 m = 4 m and 4 m /3 = 1.3 m and 3 m + 1.3 m = 4.3 m. We get the exact point with formula 15 (set a very large value for infinity, e.g. 500 000 mm):
Formula 15
For our example of Sv = 3 m and Sh = 7 m, the result is accordingly,
Calculation 20

We must focus on 4.2 m to meet our established criteria. This is quite close to the 4.3 m of the blanket 1/3 to 2/3 rule, but does not quite meet it. However, we can use Formula 15 to determine when the blanket statement applies. We simply look in which cases it leads us to the result Sv+(Sh-Sv)/3 with which it tells us that we should adjust to a point that is 1/3 between Sv and Sh. For this, we find an answer. The formula is Sh = 2*Sv, which indicates that the simplification is applicable only when the far point is twice as far away as the near point. So far, so good. This procedure applies when the far point is not located in infinity. If the far point is located in infinity, we can calculate the focus distance using the following formula:
Formula 16

To achieve the maximum sharpness from the close range to infinity at a given aperture, the photo gods have provided us with the hyperfocal distance H, which is also near the infinity point. It marks the minimum distance for each focal length and aperture from which the depth of field extends to infinity when the lens is focused to just infinity.
Formula 17

Since a difference of one focal length is insignificant for the accuracy of the hyperfocal distance, the formula is also often simplified as follows:
Formula 18

For f = 50 mm, N = 8 and z = 0.03 mm, for example:
Calculation 21


So 10.42 m is the shortest distance from which the depth of field extends to infinity for a 50 mm lens stopped down to f/8 and set to infinity. But because our section heading is „Depth of Field and Focus Point,“ let’s take the game one step further. We can extend the depth of field from half the hyperfocal distance to infinity by setting the lens to the hyperfocal distance we just found, also known as a hyperfocal setting. This maximization of depth of field is especially important in landscape photography, where we usually want as much of the foreground in focus as possible. So it applies:
Formula 19

Mathematically, this looks like this with formula 11 for the near point Sv:
Calculation 22


The distribution of the maximum allowable focus error in the object plane depends on the focus’s placement.
A curious property of hyperfocal distance and hyperfocal setting is that the size of the sharp area behaves in the ratio 1/x with each further adjustment. A lens focused at the hyperfocal distance H
will image a depth of field S between H/2 and infinity. If we set it to H/2, the sharp area extends from H/3 to H, and if we focus on H/3, S extends from H/4 to H/2. C. Welborne Piper, who discovered this behavior in 1901, dubbed it continuous depth of field. This behavior persists through all subsequent 1/x values.
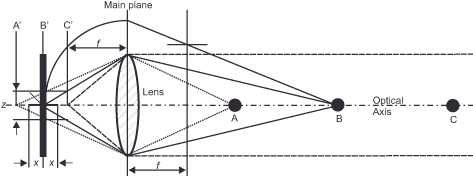
Perhaps you are now curious about how the hyperfocal setting achieves a sharp appearance from the near limit to infinity. At the very beginning of the section, we established that we can capture geometrically sharp images of objects at different distances by adjusting the distance between the focal point of the optics and the film to accommodate these different distances. This focusing causes the light rays reflected from the objects to be refracted in the lens system in each case so that they converge at the focal point. In a given constellation (Figure 31 – Hyperfocal focusing) with three objects at different distances – A close, B at medium distance, and C at long, quasi-infinite distance – in which the lens is focused on object B, the image of B falls exactly on the film plane (B‘), that of A is behind the film plane (A‘), and that of C is in front of the film plane (C‘). The ray path from C to C‘ is important because it shows that the light rays coming from this large (infinite) distance are all incident in parallel. Therefore, all light rays, regardless of their actual distance (large, still larger, or largest), converge at the same point C‘. With the hyperfocal adjustment, we now do nothing else than adjust the focus in such a way that C‘ comes to lie within the maximum permissible focus error. If this succeeds, the parallelism of the light rays ensures sharp imaging of the objects, regardless of their distance.
As we conclude this section on focal point placement, let’s tackle another ongoing debate: Is the hyperfocal setting better or worse than simply focusing at infinity? Harold M. Merklinger’s frequently cited publication (The Ins and Outs of FOCUS, Ottawa 1992, now available online at http://www.trenholm.org/hmmerk) focuses on the fact that the hyperfocal distance setting imaged distant parts of the subject with the same circle of confusion as nearby parts, resulting in equal blurring. Merklinger argues that the objects lying at infinity must be much sharper (due to their greatly reduced image size) than the larger objects at a short distance, in order to be clearly recognizable. For this reason, he rejects the hyperfocal setting and advocates additional sharpness for the distant parts of the subject by placing the focus beyond the hyperfocal distance near the infinity symbol. Proponents of this approach refer to it as the object field method, while its critics call it a waste of depth-of-field because. Although it marginally enhances sharpness at the horizon, it allocates a significant portion of the possible focus area behind the horizon, rendering it useless. The hyperfocal setting, on the other hand, distributes the sharpness from as far forward as possible to right at the horizon.
For a landscape shot, which we want to add depth to by deliberately including exciting foreground objects, this would mean focusing on the chain of hills shimmering red in the evening light at infinity and stopping down until the low-growing pines, not yet completely in shadow, are in sharp focus at the very front. – Not critically sharp, but sharp enough. This approach promotes three types of quality degradation through increased stopping down:
- It increases the diffraction discs that reduce sharpness (see section „Circle of confusion and diffraction discs – Not every aperture is a good aperture„).
- It takes the imaging system too far away from the optimal aperture for sharpness and resolution (see section „Circle of confusion and diffraction discs – Not every aperture is a good aperture„).
- It increases the susceptibility of the imaging system to blur caused by wind, because stopping down increases the exposure time.
Moreover, there is the fundamental question of why a circle of confusion diameter that is acceptable for the foreground should not be equally acceptable in the case of more distant objects. The core of the dispute between the camps is probably the lack of insight of the object field advocates (those who are disappointed by the classical depth-of-field theory) into the fact that the diameter of the circle of confusion taken as a basis by default is simply too large for their demands on magnification scale and viewing conditions, but this must by no means be accepted as such, but can and should be flexibly adjusted (see „Summary – The (short) way to a sharp image“). Correct implementation eliminates any subjective criticism of the achieved image sharpness.
The following example illustrates one of the few cases where the object field method has an advantage. A detective is standing on a platform; below him is a large crowd of people extending to a distance of several hundred meters. The detective’s task is to provide images on which the faces of all the people are recognizable. He stops the lens down until there is a circle of confusion corresponding to the diameter of the faces, focuses to infinity, and presses the shutter release. In this manner, he accomplishes his goal in a straightforward way, without sacrificing the critically sharp image of every face. Pure recognizability is enough. It also outlines the technically correct distinction between the two approaches. The classical depth of field requires equal angular resolution, but the object field method requires equal linear resolution of the objects in space. The limit value of the angular resolution is calculated as z/f (maximum permissible circle of confusion/focal length), and that of the linear resolution based on this as G*z/f (object distance to the near or far point of the depth of field* maximum permissible circle of confusion/focal length). Since the resolving power of our visual system is naturally angle-dependent, the classical approach wins in the vast majority of cases of creative photography.
Next Depth of field and image format
Main Visual acuity
Previous Depth of field and focal length
If you found this post useful and want to support the continuation of my writing without intrusive advertising, please consider supporting. Your assistance goes towards helping make the content on this website even better. If you’d like to make a one-time ‘tip’ and buy me a coffee, I have a Ko-Fi page. Your support means a lot. Thank you!
 Since I started my first website in the year 2000, I’ve written and published ten books in the German language about photographing the amazing natural wonders of the American West, the details of our visual perception and its photography-related counterparts, and tried to shed some light on the immaterial concepts of quantum and chaos. Now all this material becomes freely accessible on this dedicated English website. I hope many of you find answers and inspiration there. My books are on