You are here: Nature Science Photography – Visual acuity – Image sharpness I
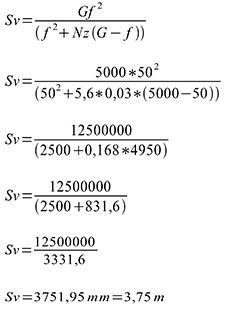
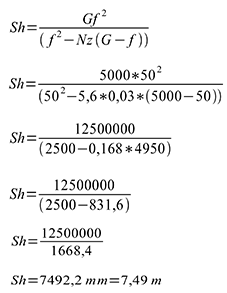
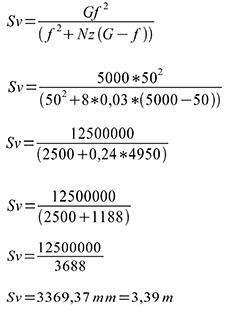
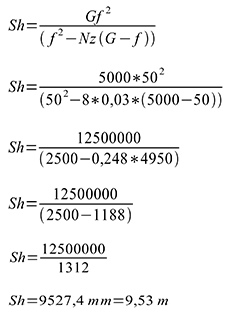
So stopping down increases the depth of field, and the calculations above explain the behavior as follows: A larger f-number increases the denominator in the calculation of Dv and decreases it in the calculation of Dh. As a result, Dv decreases and Dh increases. However, Dh grows more than Dv, so that the acceptable sharp area behind the focus point increases disproportionately. The table below clearly illustrates this effect for a larger aperture range.
| f/stop | Near point D1 | Far point D2 | Depth of field |
| 1,8 | 8,2 m | 12,7 m | 4,5 m |
| 2 | 8,1 m | 13,1 m | 5,1 m |
| 2,8 | 7,5 m | 15,0 m | 7,5 m |
| 4 | 6,8 m | 19,1 m | 12,4 m |
| 5,6 | 6,0 m | 30,2 m | 24,2 m |
| 8 | 5,1 m | 223,2 m | 218,1 m |
| 11 | 4,3 m | infinity | infinity |
Table 2 – For f=50 mm and D=10 m
In addition to understanding the mathematical derivation, we can also visualize why smaller apertures provide greater depth of field in a practical way. First, let’s understand what the f-number means. The f/5.6 indicates the ratio between the focal length f and the size of the entrance pupil. For a 50 mm lens, this free aperture is 50/5.6 = 8.93 mm; for a 100 mm lens, it is 100/5.6 = 17.86 mm – that’s right, twice the value calculated earlier. This must be the case because doubling the focal length halves the angle of view of the optics, and thus only half as much light is available for exposure. Strictly speaking, therefore, the angle of view of the lens determines the aperture size, and in any distortion-free lens, this is inversely proportional to the focal length. The aperture size, in turn, is inversely proportional to the angle of view. In wide-angle lenses, on the other hand, the angle of view also depends on the design. 16 mm lenses, for example, are available with a 180° angle of view (full-frame fisheye) or with a 95° angle of view, and the former gets by with a smaller aperture. With these lenses, the aperture size no longer follows a simple inverse-proportional function. Rather, complicated angular functions are involved.
Small f-numbers represent large effective apertures. Conversely, large f-numbers represent small apertures.
From one whole step to the next, the aperture values vary by the square root of 2 (= 1.4142…) due to the use of an area measure, where the amount of light increases proportionally to the square of the aperture diameter. This explains the following series of whole aperture values, which consistently allow half or twice the amount of light to pass through from one step to the next:
1,0 1,4 2,0 2,8 4,0 5,6 8 1 16 22 32 45 und so fort
Before someone cries out: „This is too inaccurate“, I’d rather admit it right away: The correct formula actually states the ratio between image width and pupil size, not the ratio between focal length and pupil size. The image width is not equal to the focal length but also depends on the object width. However, in practical photography, we can ignore this difference, as it is only in extreme close-ups that the values differ significantly enough to require an exposure correction factor. However, as long as you meter TTL, or through the lens, you don’t need to worry about this, as the metering electronics automatically account for it. The aperture size you see through the lens or measure when disassembling the optics may differ from the calculated value. It would be correct if the aperture was located directly in front of the front element. However, if the aperture is positioned further back in the optical path, it could potentially be smaller. In any case, the ratio between the individual stages remains unchanged.
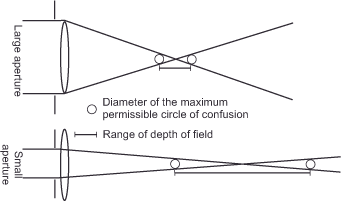
Now that we understand the concepts of f-number and aperture, we can move on to their optical significance in image formation, as illustrated in figure 28 (aperture and depth of field). We can see that the aperture reduces the amount of light passing through the lens by trimming the ray path from the edge. A small aperture narrows it more than a large one; it virtually slims it. As a result, at the same distance and focus setting, the circles of confusion are also smaller and remain at a level that appears sharp to us over a larger area in front of or behind the focal plane. The exact size of this area depends, of course, on the diameter of the underlying circle of confusion. If we want to calculate the correct aperture for a predetermined range of depth of field, we can do so with formula 15:
Formula 15

For the practical case of f = 50 mm, Dh = 7 m, Dv = 3 m, z = 0.03 mm, the following results:
Calculation 17


The aperture we are looking for is approximately f/8.
List of formula abbreviations and acronyms

f	Focal lenght of the lens
N...	f-stop number
D	Aperture diameter
A	Distance lens to film
Z	Circle of confusion
z	Maximum permissible circle of confusion
X	Focus error
x	Maximum permissible focus error
G	Subject distance
B	Image distance, distance between main plane and sharp image
Bv	Front limit of the focal depth
Bh	Rear limit of the focal depth
S	Total depth of field
Sv	Front limit of depth of field
Sh	Rear limit of depth of field
H	Hyperfocal distance
F	Format factor
OA	Lens extract
Fd	Focus distance
Next
Main Visual acuity
Previous Geometry and calculation of the depth of field
If you found this post useful and want to support the continuation of my writing without intrusive advertising, please consider supporting. Your assistance goes towards helping make the content on this website even better. If you’d like to make a one-time ‘tip’ and buy me a coffee, I have a Ko-Fi page. Your support means a lot. Thank you!


 Since I started my first website in the year 2000, I’ve written and published ten books in the German language about photographing the amazing natural wonders of the American West, the details of our visual perception and its photography-related counterparts, and tried to shed some light on the immaterial concepts of quantum and chaos. Now all this material becomes freely accessible on this dedicated English website. I hope many of you find answers and inspiration there. My books are on