You are here: Nature Science Photography – Image creation, Depth and Size – Photographic space mapping
In creative photography, we can use the converging parallels and the distorted reproduction of right angles caused by the inclination of the line of sight according to the central perspective to actively shape the spatial impression. In architectural and factual photography, however, they immediately catch our eye because of our knowledge of the nature of things and are usually not accepted. In such situations, the photographer is under pressure to keep the shooting plane strictly perpendicular to the subject in order to make the horizontals and verticals parallel and thus believable. If he leaves the position that fulfills this requirement, the parallel straight lines begin to converge into vanishing points. With adjustable lens and image standards and lenses whose image circle is several times larger than the shooting format, the view cameras mounted on optical benches offer the advantage over the rigid constructions preferably found in 35 mm and medium format of being able to control both the perspective and the exact extent of the depth of field and to reproduce the parallel lines in the image in parallel from any location.

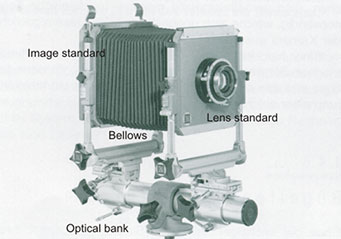
Each standard can be moved or tilted in four directions, up, down, right and left. The front lens standard controls the position of the image circle created by the lens as well as the overall sharpness and the position of the plane of focus. The rear image standard can also be used to extend the depth of field, but it mainly controls the position of the format within the image circle and determines the perspective via this positioning of the imaging plane relative to the object plane. If the image plane and the object plane are parallel to each other, the subject is imaged true to angle and thus undistorted. The more the two deviate from each other, the more pronounced the vanishing lines become. We also say „the image gains perspective“. Only a shift of the standards, but not a parallel shift of them, changes the angle between the image plane and the object plane and influences perspective and vanishing lines. Thus the photographer has the possibility to make the straight lines parallel without having to take into account the location or the angle of view and although the camera is not at right angles to them and he can reduce or intensify the vanishing lines as desired.
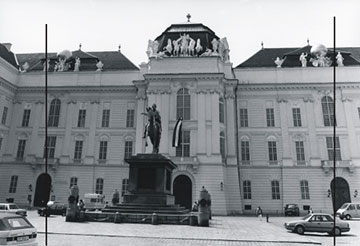
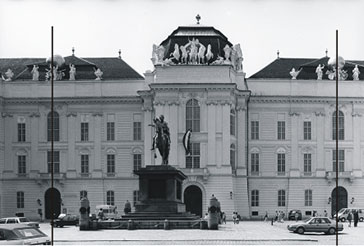
The prime example of these adjustment possibilities is the shot of a tall building with the camera aligned exactly at right angles to it. Often, the shooting angle of the lens is not sufficient to completely depict the building from a short distance under this condition, which often enough tempts us to tilt the camera upwards. But by doing so, we leave the distortion-free position and are rewarded with converging verticals according to the central perspective. – The building seems to tilt backwards in the picture, which strongly emphasizes its height. If we shoot the same building from above, from a higher location, and tilt the camera down, the same effect occurs in a negative form and the outer edges converge towards the bottom. Equipped with the adjustment capabilities of a view camera or a shift lens, we can precisely control the reproduction of the vanishing lines and the height. To do this, we first align the image standard (the entire camera in the 35 mm range) in a vertical direction parallel to the subject and move the lens standard (the shift lens in the 35 mm range) up or down until the building is completely imaged on the focusing screen. To make the image appear even more realistic, the rule of thumb is that the plunging lines are not completely compensated for if the observer has to raise or lower his head more than 20° to get a full view of the subject. So with a particularly tall building, we provoke the vanishing lines again by tilting the image standard back slightly. The resulting image is then no longer completely true to reality, but it flatters our visual perception.

Transferred to the horizontal, this means that we first align the image standard in the horizontal direction parallel to the subject and then move the lens standard laterally until the desired section is visible on the ground glass. By combining the vertical and horizontal adjustments, it is possible, for example, to image a subject with correct front and side views in perspective.
In the field of 35 mm or medium format cameras, the so-called shift lenses allow a similar, albeit much less pronounced, adjustment. These are specially adapted lenses whose image circle has a larger format and which can therefore be shifted parallel to the image plane by means of a mechanism. For all photographers whose shooting system does not have its own shift optics, the panorama shift adapter from the Zörkendörfer company is the tool of choice. It adapts lenses of different medium format systems to a large number of different 35 mm cameras in such a way that a wide adjustment range of ± 20 mm and the possibility of 360° rotation are obtained. The related Pro-Shift adapter does this for medium format cameras and those 35 mm SLRs where a far protruding viewfinder obstructs the adjustment travel. A special version of the adapter with a tripod thread on the lens bayonet allows doubling the sensor size of a digital SLR camera. With the lens fixed, the camera is shifted here for two adjacent exposures within the subject. The subsequent mounting of both exposures on the PC then ensures that the image resolution is doubled. As of this writing in 2024, the company seems to be closed but the products are still available in the second hand market.
Shooting practice using the shift option is the same for native lenses and lenses connected with the panorama shift adapter. You position yourself in front of your subject and set the camera, preferably mounted on the tripod, to the desired image section. Then you shift the lens until the desired correction effect is achieved. Since the range of adjustment is not infinite, you may need to correct the tilt and crop in order to achieve parallelism between the object plane and the image plane. If it is ensured, note the amount of adjustment and set the shift back to zero. Then make the final distance setting and the manual exposure metering. It should be noted that you usually do not have an automatic diaphragm and therefore the exposure must be determined at working aperture, i.e. with the lens stopped down and a correspondingly dark viewfinder image. With any normal lens, you simulate this effect by pressing the stop-down button. For this reason, the quality of the viewfinder is very important. In any case, it should not have any strong distortion so that the course of the straight lines in the image can be followed perfectly, and it should have the option of using a ground-glass screen with a grid. If it also displays 98% to 100% of the actual image, you are very well equipped. If all settings are correct, shift again to the previously determined value, check the viewfinder image one last time at the working aperture and release.


Figure 63: Camera horizontal, building undistorted
In the meantime, many image editing programs also offer the possibility, copied from the wet lab, of rectifying the perspective of finished images and thus imitating the effect of the described camera adjustment in retrospect. In the darkroom, the image plane was simply tilted under the enlarger until the verticals ran parallel; on the computer, the respective image corners are pulled apart evenly for this purpose.
Next Building blocks of our size perception – The angle of vision
Main Image creation, Depth and Size
Previous Imaging factors
If you found this post useful and want to support the continuation of my writing without intrusive advertising, please consider supporting. Your assistance goes towards helping make the content on this website even better. If you’d like to make a one-time ‘tip’ and buy me a coffee, I have a Ko-Fi page. Your support means a lot. Thank you!


 Since I started my first website in the year 2000, I’ve written and published ten books in the German language about photographing the amazing natural wonders of the American West, the details of our visual perception and its photography-related counterparts, and tried to shed some light on the immaterial concepts of quantum and chaos. Now all this material becomes freely accessible on this dedicated English website. I hope many of you find answers and inspiration there. My books are on